
完成上述操作后,将“备注”字段删除。
题目
完成上述操作后,将“备注”字段删除。
相似考题
更多“完成上述操作后,将“备注”字段删除。 ”相关问题
-
第1题:
在Access2010中,数据表中的()。A、字段可以随意删除
B、字段删除后数据保留
C、作为关系的字段需先删除关系,再删除字段
D、字段输入数据后将无法删除
参考答案:C
-
第2题:
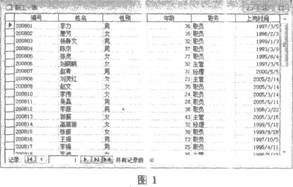
在考生文件夹下的“Ac r l.mdb”数据库中已建立表对象“职工”。试按以下操作要求,完成对表“职工”的编辑修改和操作: (1)将“职工号”字段改名为“编号”,并设置为主键。 (2)设置“年龄”字段的芎效性规则为“年龄>;20”。 (3)设置“上岗时间”字段的默认值为“1998—8—14”。 (4)删除表结构中的“简历”字段。 (5)将考生文件夹下“Acc0.mdb”数据库中的表对象“ttemp”导入“Accl.mdb”数据库中。 (6)完成上述操作后,在“Accl.mdb”数据库中备份表对象“职工”,并命名为“tempbak。最终效果图如图l所示。
 正确答案:
正确答案:
(1)在“Accl.mdb”数据库中单击“职工”表,单击“设计”按钮,打开“职工”设计视图,单击“字段名称”是“职工号”的地方,将其修改为“编号”,并在其上单击鼠标右键,在弹出的快捷菜单中选择“主键”命令。单击“保存”按钮进行保存。
(2)选中“年龄”字段,在“有效性规则”中输入“>20”。 单击“保存”按钮进行保存。
(3)选中“上岗时间”字段,在“默认值”栏中输入“#1998—8—14#”。单击“保存”按钮进行保存。
(4)在“简历”字段上单击鼠标右键,在弹出的快捷菜单中选择“删除行”命令,在弹出的确认对话框中单击“是”按钮。单击“保存”按钮进行保存,并关闭设计视图。
(5)在“Accl.mdb”数据库窗口中执行“文件”一“获取外部数据”一“导入”命令,打开“导入”对话框,选择考生文件夹下的“Acc0.mdb”数据库文件,并单击“导入”按钮。在弹出的“导入对象”对话框中的“表”选项卡中选择“ttemp”表,并单击“确定”按钮。
(6)在“Accl.mdb”数据库窗口中右键单击“职工”表,在弹出的快捷菜单中选择“复制”命令。在Examl数据库窗口中空白处单击鼠标右键,在弹出的快捷菜单中选择“粘贴”命令,弹出“粘贴表方式”对话框。在文本框中输入“temp— bak”,选中“结构和数据”单选按钮,然后单击“确定”按钮。 -
第3题:
文件夹下,"samp1.mdb"数据库文件中已建立表对象"tNorm"。试按以下操作要求,完成表的编辑: (1)设置"产品代码"字段为主键; (2)将"单位"字段的默认值属性设置为"只"、字段大小属性改为1; (3)删除"规格"字段值为"220V-4W"的记录; (4)删除"备注"字段; (5)将"最高储备"字段大小改为长整型,"最低储备"字段大小改为整型; (6)将"出厂价"字段的数据类型设置为货币型。
【审题分析】(1)主要考查美化表中字体改变、调整行高与列宽。(2)主要考查字段说明的添加,字段说明的添加主要是让阅读数据库的人读懂了解字段的含义,对数据库的运行和功能没有影响。(3)主要考查表的数据类型的修改。(4)主要考查01E对象的图片的修改与重设.(5)考查表字段的显示与掩藏。(6)考查表字段的添加与删除的方法。 表的格式的美化在表视图下通过“格式”菜单实现在表设计视图下完成对字段的修改、添加、删除等操作。 【操作步骤】 步骤1:双击打开“samp1.mdb”数据库窗口,单击“表”对象,双击打开“tStud”表。执行【格武】一【字体】菜单命令,打开“字体”对话框。在“字号”列表中选择“14”。 步骤2:单击“确定”按钮,如图1所示。 步骤3:执行【格式】一【行高】菜单命令,打开“行高”对话框。在“行高”对话框中输入“18”,单击“确定”按钮。关闭“tStud”表。 -
第4题:
考生文件夹下存在一个数据库文件“sampl.mdb”,里面已经设计好表对象“tStud”。请按照以下要求,完成对表的修改:
(1)设置数据表显示的字体大小为14、行高为18。
(2)设置“简历”字段的说明为“自上大学起的简历信息”。
(3)将“年龄”字段的数据类型改为“整型”字段大小的数字型。
(4)将学号为“2001 1001”学生的照片信息换成考生文件夹下的“photo.bmp”图像文件。
(5)将隐藏的“党员否”字段重新显示出来。
(6)完成上述操作后,将“备注”字段删除。
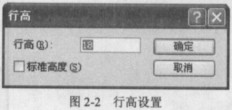
正确答案:(1)步骤l:双击打开“sampl.mdb”数据库窗口单击“表”对象双击打开“tStud”表。执行【格式】→【字体】菜单命令打开“字体”对话框。在“字号”列表中选 择“14”。 步骤2:单击“确定”按钮如图2-1所示。 步骤3:执行【格式】→【行高】菜单命令打开“行高”对话框。在“行高”对话框中输入“18”单击“确定”按钮。如图2-2所示。关闭“tStud”表。
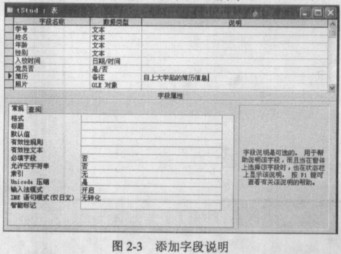
 (2)步骤1:选中“tStud”表单击“设计”按钮。在“简历”字段所在行的说明部分单击鼠标定位光标后输入“自上大学起的简历信息”。如图2-3所示。
 步骤2:单击工具栏中的“保存”按钮。关闭“tStud”表的设计视图。
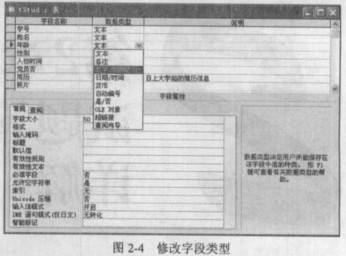
(3)步骤1:选中“tStud”表单击“设计”按钮在“tStud”表设计视图下单击“年龄”字段所在行的数据类型选中“数字”类型。如图2.4所示。
步骤2:单击工具栏中的“保存”按钮。关闭“tStud”表的设计视图。
步骤2:单击工具栏中的“保存”按钮。关闭“tStud”表的设计视图。
(3)步骤1:选中“tStud”表单击“设计”按钮在“tStud”表设计视图下单击“年龄”字段所在行的数据类型选中“数字”类型。如图2.4所示。
步骤2:单击工具栏中的“保存”按钮。关闭“tStud”表的设计视图。
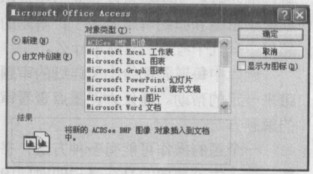
 (4)步骤1:双击打开“tStud”表选中学号为“20011001”照片信息执行【插入】→【对象】菜单命令打开对象对话框。如图2-5所示。
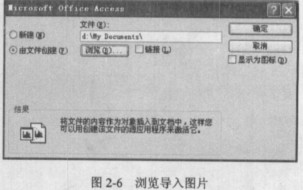
 步骤2:选择“由文件创建”选项。单击“浏览”按钮查找图片“photo.bmp”存储位置单击“确定”按钮如图2-6所示。
步骤3:单击“确定”按钮关闭“tStud”表窗口。
步骤2:选择“由文件创建”选项。单击“浏览”按钮查找图片“photo.bmp”存储位置单击“确定”按钮如图2-6所示。
步骤3:单击“确定”按钮关闭“tStud”表窗口。
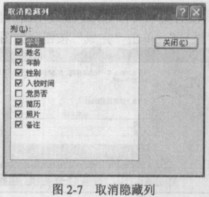
 (5)步骤1:双击打开“tStud”表执行【格式】→【取消隐藏列】菜单命令打开“取消隐藏列”对话框。如图2-7所示。
步骤2:勾选“党员否”复选框。单击“关闭”按钮关闭“tStud”表窗口。
(5)步骤1:双击打开“tStud”表执行【格式】→【取消隐藏列】菜单命令打开“取消隐藏列”对话框。如图2-7所示。
步骤2:勾选“党员否”复选框。单击“关闭”按钮关闭“tStud”表窗口。
 (6)步骤1:双击打开“tStud”表单击“备注”列(选中该列)。右键单击鼠标弹出快捷菜单单击“删除列”命令。
步骤2:在弹出的对话框中单击“是”按钮单击“保存”按钮。关闭“tStud”表窗口。
步骤3:关闭“sampl.mdb”数据库。
(6)步骤1:双击打开“tStud”表单击“备注”列(选中该列)。右键单击鼠标弹出快捷菜单单击“删除列”命令。
步骤2:在弹出的对话框中单击“是”按钮单击“保存”按钮。关闭“tStud”表窗口。
步骤3:关闭“sampl.mdb”数据库。
(1)步骤l:双击打开“sampl.mdb”数据库窗口,单击“表”对象,双击打开“tStud”表。执行【格式】→【字体】菜单命令,打开“字体”对话框。在“字号”列表中选 择“14”。 步骤2:单击“确定”按钮,如图2-1所示。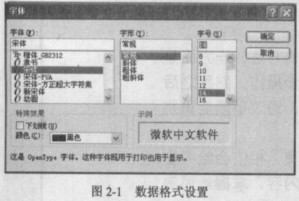 步骤3:执行【格式】→【行高】菜单命令,打开“行高”对话框。在“行高”对话框中输入“18”,单击“确定”按钮。如图2-2所示。关闭“tStud”表。
 (2)步骤1:选中“tStud”表,单击“设计”按钮。在“简历”字段所在行的说明部分单击鼠标,定位光标后输入“自上大学起的简历信息”。如图2-3所示。
 步骤2:单击工具栏中的“保存”按钮。关闭“tStud”表的设计视图。
(3)步骤1:选中“tStud”表,单击“设计”按钮,在“tStud”表设计视图下,单击“年龄”字段所在行的数据类型,选中“数字”类型。如图2.4所示。
步骤2:单击工具栏中的“保存”按钮。关闭“tStud”表的设计视图。
步骤2:单击工具栏中的“保存”按钮。关闭“tStud”表的设计视图。
(3)步骤1:选中“tStud”表,单击“设计”按钮,在“tStud”表设计视图下,单击“年龄”字段所在行的数据类型,选中“数字”类型。如图2.4所示。
步骤2:单击工具栏中的“保存”按钮。关闭“tStud”表的设计视图。
 (4)步骤1:双击打开“tStud”表,选中学号为“20011001”照片信息,执行【插入】→【对象】菜单命令,打开对象对话框。如图2-5所示。
 步骤2:选择“由文件创建”选项。单击“浏览”按钮查找图片“photo.bmp”存储位置,单击“确定”按钮,如图2-6所示。
步骤3:单击“确定”按钮,关闭“tStud”表窗口。
步骤2:选择“由文件创建”选项。单击“浏览”按钮查找图片“photo.bmp”存储位置,单击“确定”按钮,如图2-6所示。
步骤3:单击“确定”按钮,关闭“tStud”表窗口。
 (5)步骤1:双击打开“tStud”表,执行【格式】→【取消隐藏列】菜单命令,打开“取消隐藏列”对话框。如图2-7所示。
步骤2:勾选“党员否”复选框。单击“关闭”按钮,关闭“tStud”表窗口。
(5)步骤1:双击打开“tStud”表,执行【格式】→【取消隐藏列】菜单命令,打开“取消隐藏列”对话框。如图2-7所示。
步骤2:勾选“党员否”复选框。单击“关闭”按钮,关闭“tStud”表窗口。
 (6)步骤1:双击打开“tStud”表,单击“备注”列(选中该列)。右键单击鼠标弹出快捷菜单,单击“删除列”命令。
步骤2:在弹出的对话框中单击“是”按钮,单击“保存”按钮。关闭“tStud”表窗口。
步骤3:关闭“sampl.mdb”数据库。 解析:(1)主要考查美化表中字体改变、调整行高与列宽。(2)主要考查字段说明的添加,字段说明的添加主要是让阅读数据库的人读懂了解字段的含义,对数据库的运行和功能没有影响。(3)主要考查表的数据类型的修改。(4)主要考查OLE对象的图片的修改与重设。(5)考查表字段的显示与掩藏。(6)考查表字段的添加与删除的方法。
(6)步骤1:双击打开“tStud”表,单击“备注”列(选中该列)。右键单击鼠标弹出快捷菜单,单击“删除列”命令。
步骤2:在弹出的对话框中单击“是”按钮,单击“保存”按钮。关闭“tStud”表窗口。
步骤3:关闭“sampl.mdb”数据库。 解析:(1)主要考查美化表中字体改变、调整行高与列宽。(2)主要考查字段说明的添加,字段说明的添加主要是让阅读数据库的人读懂了解字段的含义,对数据库的运行和功能没有影响。(3)主要考查表的数据类型的修改。(4)主要考查OLE对象的图片的修改与重设。(5)考查表字段的显示与掩藏。(6)考查表字段的添加与删除的方法。
表的格式的美化在表视图下通过“格式”菜单实现。在表设计视图下完成对字段的修改、添加、删除等操作。 -
第5题:
表的设计视图中,不能完成的操作是()。A.修改字段的属性
B.删除一个字段
C.修改字段的名称
D.删除一条记录答案:D解析:表的设计视图,主要是对表的操作,能完成的操作有修改字段的属性、删除一个字段、修改字段的名称,但不能删除一条记录。